If you’re wondering how to draw a banner ribbon, head this way. Drawing a banner ribbon can be super easy and fun. All you need to do to set yourself up for success is draw them in the right order.
This is because a banner ribbon has parts that are visible in the forefront and parts that are hidden. In order for a banner to look right, the hidden parts can’t be visible. Since that’s a hard rule, one wrong line means you’ll have to start over. Not the end of the world – just the end of that banner.
All it takes to draw a banner is following the step-by-step instructions below. Okay, and maybe a little practice to improve the steadfastness of your drawing lines.
Grab your favorite pen or pencil let’s get to it.
How to Draw a Banner Ribbon
We’re going to cover three different hand-drawn banners: a simple straight banner, an arch ribbon banner, and a wavy ribbon banner. Each one starts with simple lines that make basic shapes, followed by some more small lines… and done!
How to Draw a Straight Ribbon Banner
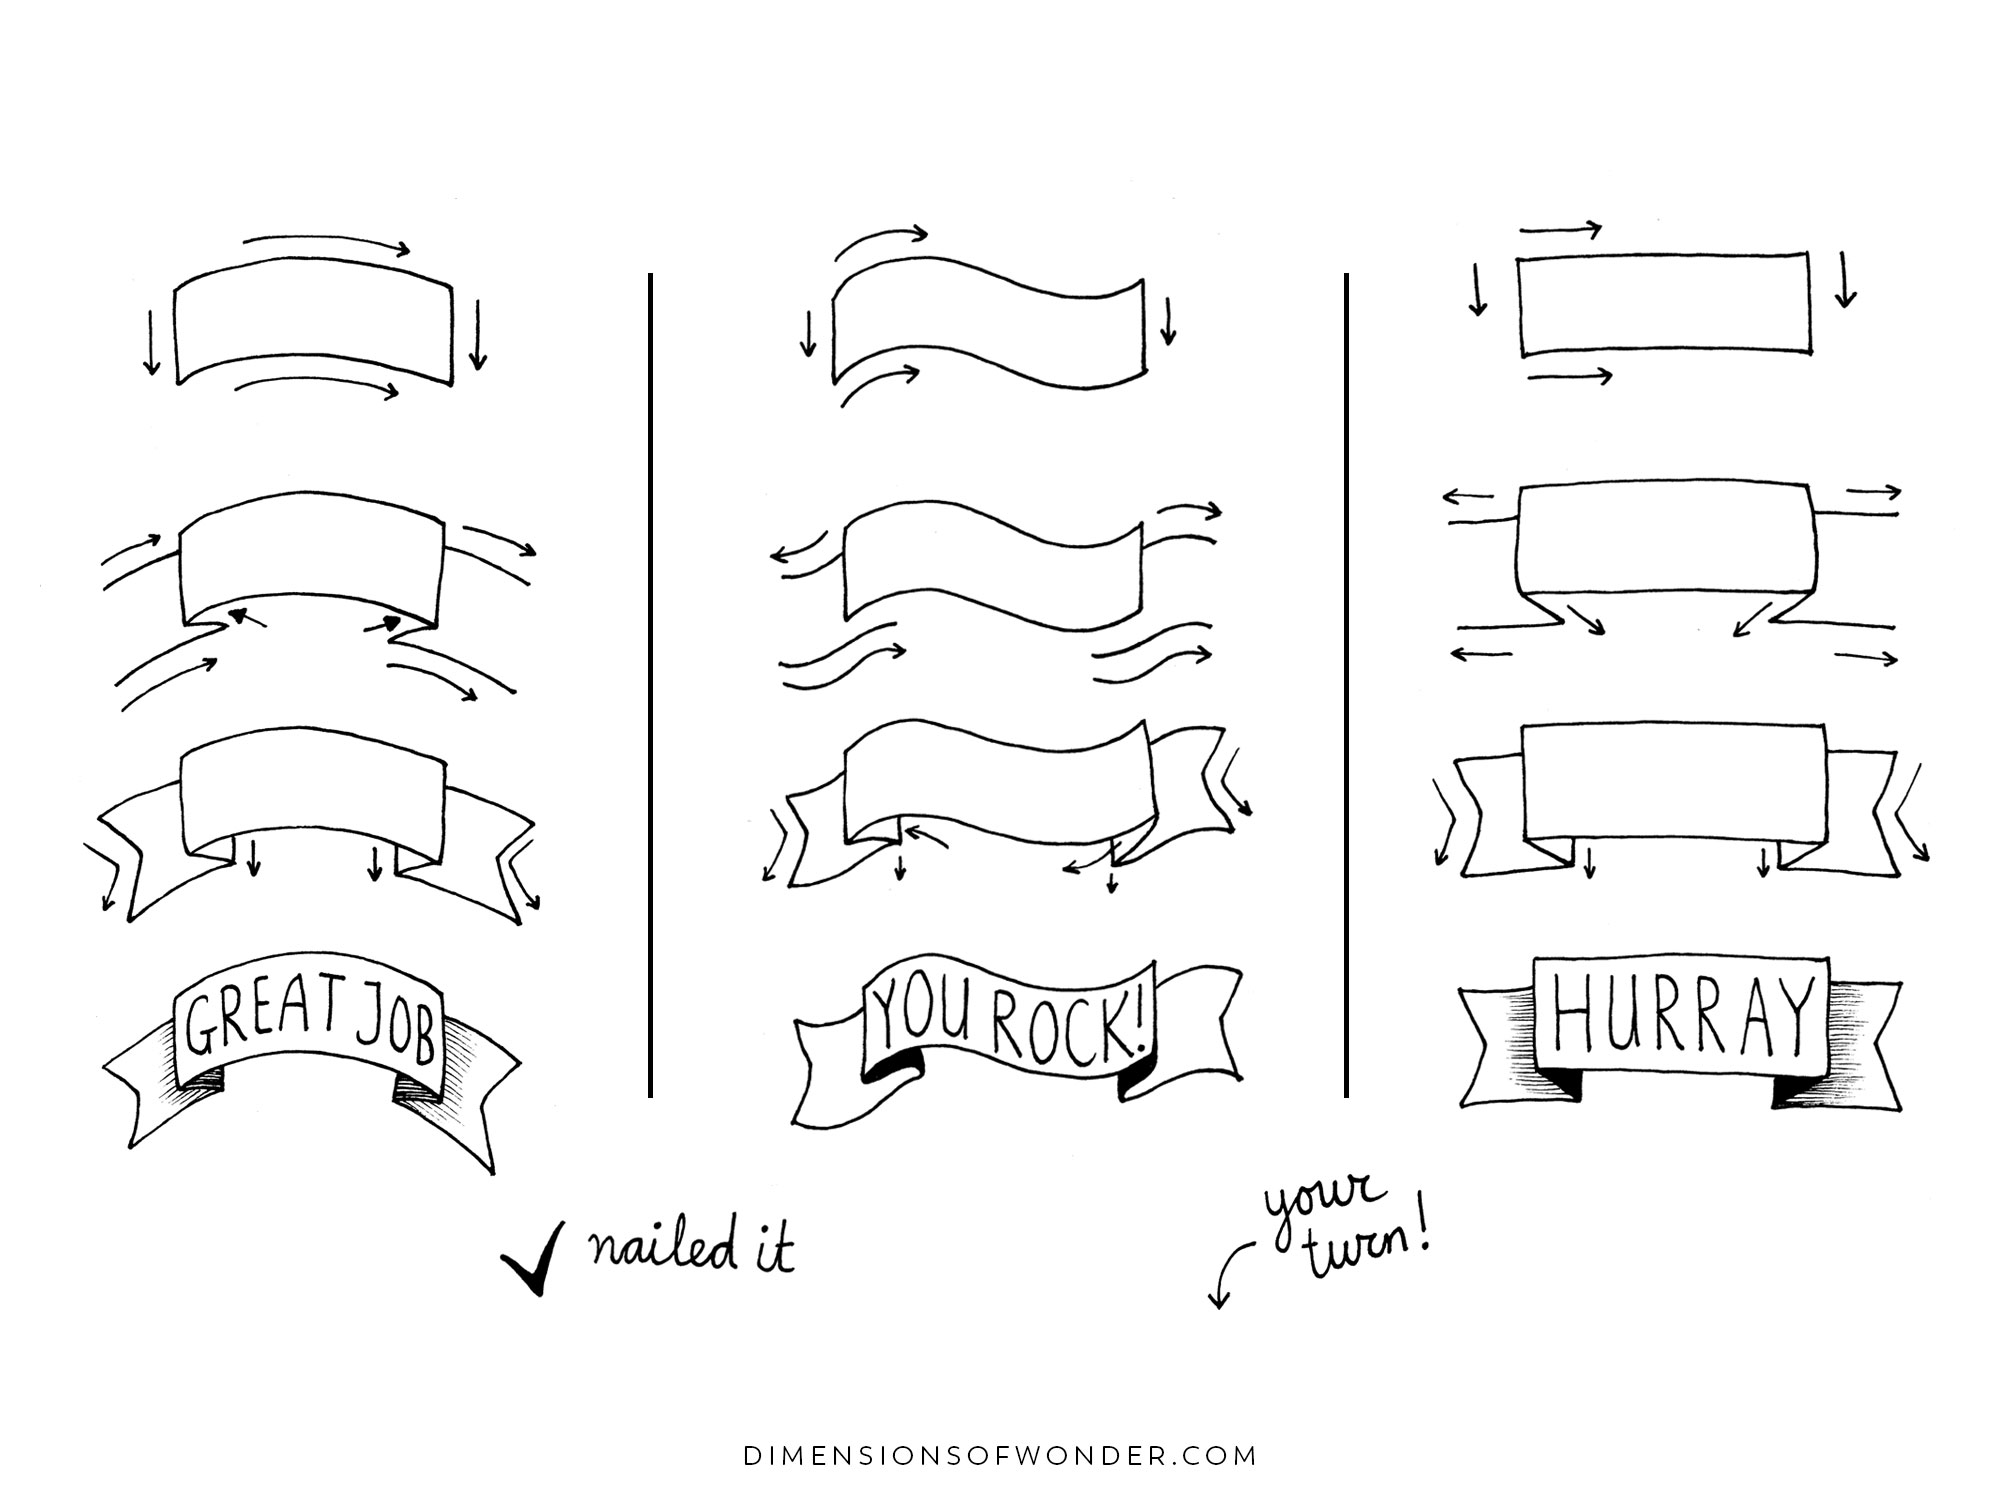
For the straight banner, start by drawing four lines to make a straight rectangle. I find it easiest to start with the line that makes the top of the rectangle, draw both the horizontal lines first and the vertical lines next. This may be different for you, depending on which is your dominant hand.

Next, we draw the ends that come out from behind each side of the main rectangle. That’s basically two parallel lines on each side, somewhat hidden behind the front of the banner.
Now we connect the lower corners of the front piece to the lines we just drew. And then, add a small vertical stripe. This forms two small triangles, which you can do with what you like – in the example, I went with coloring them in the give a sense of depth.
Almost done already!
The ribbon edges – you can choose to draw them straight, in a v-shape (as seen here), at an angle, or maybe you are sitting on a great idea for another fun way to draw the end of the banner.
That’s it. An easy way to draw a straight ribbon banner.
That wasn’t hard, right?! If you can get a small rectangle on the paper, with a few extra steps that are basically just lines, you can turn it into a simple banner.
Ready to try the wave ribbon banner?
How to Draw a Wave Ribbon Banner
The wind got a hold of our rectangle. What was a straight line is now a wavy line, kind of like a flag shape. Other than that, the approach is exactly the same.

The numbers one and two in the picture show the wavy lines, which you draw first, at equal distances. Close the side of your banner on each side.
Then, for the pieces behind the front of the banner, you’ll want to make sure those lines (steps five, six, seven, and eight) follow the wavy rectangle’s shape.
That can be a little tricky. Imagine them as parallel lines to the first two, or take a pencil and actually draw a few parallel lines, which you can erase later. Of course, freehanding it and messing it up a few times is fine, too.
After that, all that is left to do is connect the bottom corner on each side with a small diagonal line. (By the way, you can totally choose to flip the angle and draw the portions of the banner that fall behind the front piece folding back behind the top corner. Bird view or frog view – the choice is yours.)
Lastly, connect the final pieces as seen in steps nine, ten, thirteen, and fourteen – and the ends of the ribbon are done. Drop shadow in the crevices to make a wavy banner that pops!
How to Draw an Arch Ribbon Banner
After the wavy banner ribbon, the arch banner is a piece of cake. This is another fun take on banner ribbons, which can also be flipped upside down for a different angle.

With a curved line in place of a rectangle (or wave), the edges are easy – as easy as steps five, six, seven, and eight. Connecting the pieces as in steps nine, ten, thirteen, and fourteen – you’ll have these simple steps down pat by now, right?
I went with some shade lines coming out from under the side of the banner for a vintage effect. The lines in the small triangles are darker on purpose.
Actually, I’m not quite sure they go in the right direction here. Should they follow the curve of the arch? Vertical stripes seem like a better idea, in retrospect. Or coloring those details straight-up black to avoid the issue altogether.
Bottom Line (Pun Intended)
I hope you enjoyed these simple tutorials showing how to draw a banner ribbon.
Once you’re able to draw these, you should try a double banner or even a triple one! The same easy steps apply, except that you connect the parts instead of drawing loose ends.
With a bit of practice, you’ll be drawing smooth lines that form a (nearly) perfect banner in no time. And once you know how to draw a banner fairly well, you’ll be able to use them left and right.
For example:
- Add some hand lettering and create awesome hipster greeting cards with a vintage vibe.
- Use them as bullet journal banners to create the prettiest spreads.
- Experiment with different widths, to fit all sorts of text shapes.
- If drawing is more your thing than hand-lettering, scan your banners in and use a type tool, like the ones in Canva or Adobe Photoshop. A nicely placed banner against an interesting (but not too distracting) backdrop (such as these hand-painted ones by Two Lil’ Owls) + an inspirational quote = your very own printable art.
- And for you bullet journalers out there, check out these tiny flower doodles. That’s how to turn a simple bullet journal banner into something more ornate.